Main page
About us
Sliding Bearings Consulting
Advertising Opportunities

to Metals
to Metal properties and tests
Hardness test methods
Dr. Dmitri Kopeliovich
Hardness is resistance of material to plastic deformation caused by indentation.
Sometimes hardness refers to resistance of material to scratching or abrasion.
In some cases relatively quick and simple hardness test may substitute tensile test.
Hardness may be measured from a small sample of material without destroying it.
There are hardness methods, allowing to measure hardness onsite.
Principle of any hardness test method is forcing an indenter into the sample surface followed by measuring dimensions of the indentation (depth or actual surface area of the indentation).
Hardness is not fundamental property and its value depends on the combination of yield strength, tensile strength and modulus of elasticity.
Benefits of hardness test:
- Easy
- Inexpensive
- Quick
- Non-destructive
- May be applied to the samples of various dimensions and shapes
- May be performed in-situ
Depending on the loading force value and the indentation dimensions, hardness is defined as a macro- , micro- or nano-hardness.
Macro-hardness tests (Rockwell, Brinell, Vickers) are the most widely used methods for rapid routine hardness measurements. The indenting forces in macro-hardness tests are in the range of 50N to 30000N.
Micro-hardness tests (micro-Vickers, Knoop) is applicable when hardness of coatings, surface hardness, or hardness of different phases in the multi-phase material is measured. Small diamond pyramid is used as indenter loaded with a small force of 10 to 1000gf.
Nano-hardness test uses minor loads of about 1 nano-Newton followed by precise measuring depth of indentation.
Brinell Hardness Test
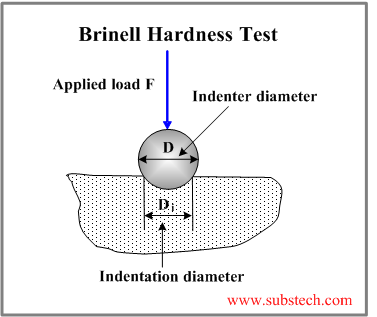
In this test a hardened steel ball of 2.5, 5 or 10 mm in diameter is used as indenter.
The loading force is in the range of 300N to 30000N (300N for testing lead alloys, 5000N for testing aluminum alloys, 10000N for copper alloys, 30000N for testing steels). The Brinell Hardness Number (HB) is calculated by the formula:
HB = 2F/ (3.14D*(D-(D² - Di²)½))
Where
F- applied load, kg
D – indenter diameter, mm
Di – indentation diameter, mm.
In order to eliminate an influence of the specimen supporting base, the specimen should be seven times (as minimum) thicker than indentation depth for hard alloys and fifteen times thicker than indentation depth for soft alloys.
Rockwell Hardness Test
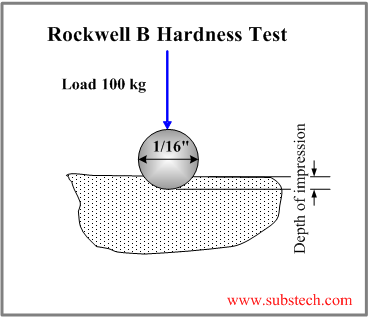
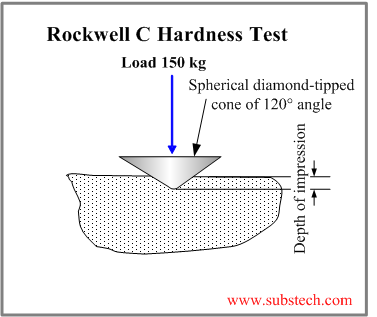 In the Rockwell test the depth of the indenter penetration into the specimen surface is measured. The indenter may be either a hardened steel ball with diameter 1/16”, 1/8” or a spherical diamond cone of 120º angle (Brale).
Loading procedure starts from applying a minor load of 10 kgf (3kgf in Rockwell Superficial Test) and then the indicator, measuring the penetration depth, is set to zero. After that the major load (60, 100 or 150 kgf)is applied. The penetration depth is measured after removal of the major load.
Hardness is measured in different scales (A, B, C, D, E, F, G, H, K) and in numbers, having no units (in contrast to Brinell and Vickers methods).
Aluminum alloys, copper alloys and soft steels are tested with 1/16” diameter steel ball at 100 kgf load (Rockwell hardness scale B).
Harder alloys and hard cast iron are tested with the diamond cone at 150 kgf (Rockwell hardness scale C).
An example of Rockwell test result: 53 HRC. It means 53 units, measured in the scale C by the method HR (Hardness Rockwell).
Rockwell Superficial Hardness Test
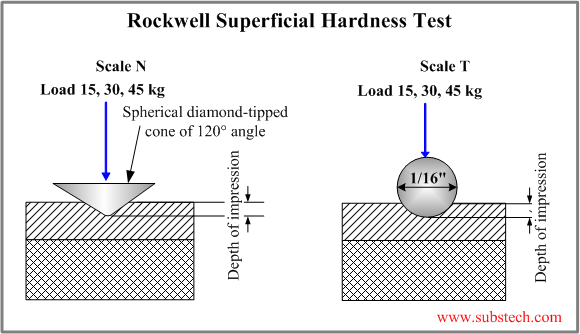
Rockwell Superficial Test is applied for thin strips, coatings, carburized surfaces.
Reduced loads (15 kgf, 30 kgf, and 30 kgf) as a major load and deduced preload (3kgf) are used in the superficial test.
Depending on the indenter, two scales of Rockwell Superficial method may be used: T (1/16” steel ball) or N (diamond cone).
62 R30T means 62 units, measured in the scale 30T (30 kgf, 1/16” steel ball indenter) by the Rockwell Superficial method (R).
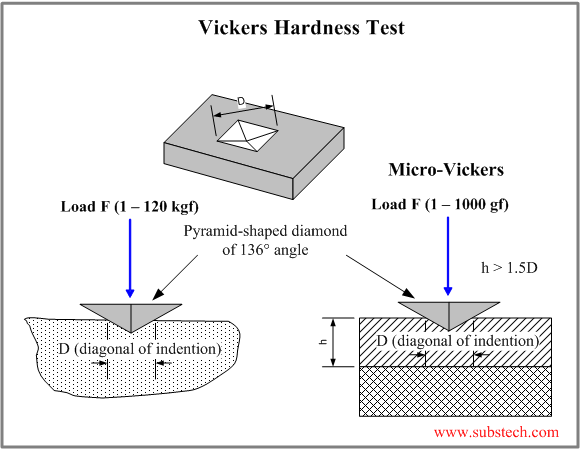
Vickers Hardness Test
The principle of the Vickers Hardness method is similar to the Brinell method.
The Vickers indenter is a 136 degrees square-based diamond pyramid.
The impression, produced by the Vickers indenter is clearer, than the impression of Brinell indenter, therefore this method is more accurate.
The load, varying from 1kgf to 120 kgf, is usually applied for 30 seconds.
The Vickers number (HV) is calculated by the formula:
HV = 1.854*F/ D²
Where
F-applied load, kg
D – length of the impression diagonal, mm
The length of the impression diagonal is measured by means of a microscope, which is usually an integral part of the Vickers Tester.
Knoop Hardness Test
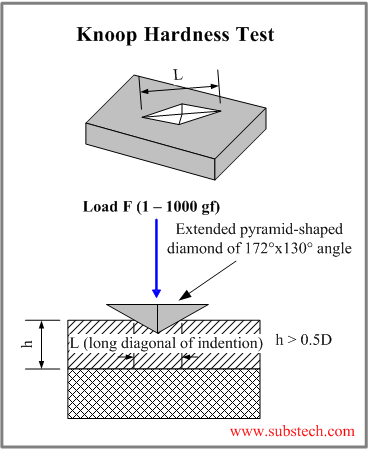
A diamond pyramid indenter with angles 130º and 170º30’ is used in this method.
The Knoop Hardness Test is applied for testing soft material and thin coating, since the penetration depth is very small (about 1/30 of the impression length).
The loading force in the Knoop method are usually in the range of 10 gf to 1000gf (micro-hardness range).
The Knoop number (HK) is calculated by the formula:
HK = 14.229*F/L²
Where
F-applied load, kg
L – long diagonal of the impression, mm
Shore Scleroscope Hardness Test
The Shore Scleroscope hardness is associated with the elasticity of the material.
The appliance consists of a diamond-tipped hammer, falling in a graduated glass tube from a definite height. The tube is divided into 140 equal parts.
The height of the first rebound is the hardness index of the material.
The harder the material, the higher the rebound.
The Shore method is widely used for measuring hardness of large machine components like rolls, gears, dies, etc.
The Shore scleroscope is not only small and mobile, it also leaves no impressions on the tested surface.
to top
Related internal links


